
Monday, October 28, 2013
Tuesday, October 8, 2013
GIF Comic: Roommate Problems
This is my first ever experiment with a GIF comic... a format that I've never actually seen before on the internet. This is for those of us who have lived with another person:

Thursday, July 18, 2013
New 30 Sec Animated Short: The Future of All Video Games
Please enjoy my latest animated short which features sound design by Brandon Griffith and Greg Nicolett:
Wednesday, July 17, 2013
The Best Way to Create Add Edits For Your Multigroups
This tutorial explains the most efficient way to create Add Edits when preparing subclips for multigrouping in Avid. Full credit goes to Rob Kraut for this tip.
Here are some reasons why you'll want to use this Add Edit technique when multigrouping:
Take this sync map before Add Edits:

And after (red lines added for emphasis):

This is an inefficient strategy. The Rob Kraut Add Edit gives you the exact same functionality with a fraction of the subclips, so instead the above timeline can look like this:

This technique is easy to learn and once implemented will save you significant time while multigrouping. Without further ado, here is the general rule for the best way to Add Edit:
Relatively easy to say, harder to visualize.
Here again is that same timeline from earlier, the clean sync map:

Now with the Rob Kraut Add Edits:

With this technique, I am only making an Add Edit when it is necessitated by a new instance of a clip, whether it be camera 1, camera 2 or external audio. In this case, the Add Edits are mostly prompted by the trigger-happy operator of camera 2.
To make it clearer, I numbered the "groups" of clips. Avid likes its multigroup subclips in stacked, one-clip-instance-per-camera portions. You'll notice that no cameras or audio clips have multiple clip instances in any of the "groups":

To make it even clearer, here is a video that walks you through the logic behind each of the Add Edits I made in this sequence:
And that is the Rob Kraut Add Edit.
If this was helpful to you, please share this with others who could benefit! Thanks!
For a comprehensive multigrouping tutorial please check out this page by Tim Leavitt: http://viewfromthecuttingroomfloor.wordpress.com/2008/04/17/multigroups/
As well as this excellent multigrouping video tutorial by Vincent Rocca: http://www.youtube.com/watch?v=aDR8nRXSTyc
Here are some reasons why you'll want to use this Add Edit technique when multigrouping:
- Cameras will no longer shift their banks. They maintain position throughout the multigroup clip which should make both you and your editor very happy.
- Fewer subclips (both while multigrouping and in the final laid out multigroup clip)
- Fewer subclips to add auxiliary timecode to (to learn how you can automate applying auxiliary timecode to your subclips, click this link: http://willblanksblog.blogspot.com/2013/06/adding-auxiliary-timecode-with-quickeys.html)
- Fewer clips to troubleshoot if anything goes wrong
- Save precious time!
Take this sync map before Add Edits:

And after (red lines added for emphasis):

This is an inefficient strategy. The Rob Kraut Add Edit gives you the exact same functionality with a fraction of the subclips, so instead the above timeline can look like this:

This technique is easy to learn and once implemented will save you significant time while multigrouping. Without further ado, here is the general rule for the best way to Add Edit:
One clip instance per camera/audio clip, per group.
Relatively easy to say, harder to visualize.
Here again is that same timeline from earlier, the clean sync map:

Now with the Rob Kraut Add Edits:

With this technique, I am only making an Add Edit when it is necessitated by a new instance of a clip, whether it be camera 1, camera 2 or external audio. In this case, the Add Edits are mostly prompted by the trigger-happy operator of camera 2.
To make it clearer, I numbered the "groups" of clips. Avid likes its multigroup subclips in stacked, one-clip-instance-per-camera portions. You'll notice that no cameras or audio clips have multiple clip instances in any of the "groups":

To make it even clearer, here is a video that walks you through the logic behind each of the Add Edits I made in this sequence:
And that is the Rob Kraut Add Edit.
If this was helpful to you, please share this with others who could benefit! Thanks!
For a comprehensive multigrouping tutorial please check out this page by Tim Leavitt: http://viewfromthecuttingroomfloor.wordpress.com/2008/04/17/multigroups/
As well as this excellent multigrouping video tutorial by Vincent Rocca: http://www.youtube.com/watch?v=aDR8nRXSTyc
Monday, July 1, 2013
Latest Short Film
Check it out! Video game humor!
Thanks to Mike, Brandon (Sound Design/Mixing), and Rich.
Thanks to Mike, Brandon (Sound Design/Mixing), and Rich.
Sunday, June 30, 2013
Avid Tip: Adding Auxiliary Timecode With QuicKeys / Keyboard Maestro / Keyboard Macros
--> This tutorial will show you how to automate the application of Auxiliary Timecode while multigrouping using the keyboard macro software of your choice. This will eliminate hours of pain/suffering from your workflow.
NOTE: This tutorial is geared towards a Mac setup. I don't know whether or not the QuicKeys file I provide will work on a PC, but the process should be easily recreated in whatever software you are using.
Thanks to Vinnie Manierre for providing this information/collaborating with me and thanks to some other very talented post production gurus and AEs as well, including Rob Kraut and Vincent Rocca.
For a comprehensive multigrouping tutorial please check out this page by Tim Leavitt: http://viewfromthecuttingroomfloor.wordpress.com/2008/04/17/multigroups/
As well as this excellent multigrouping video tutorial by Vincent Rocca: http://www.youtube.com/watch?v=aDR8nRXSTyc
OK. Let's get started!
You Will Need:
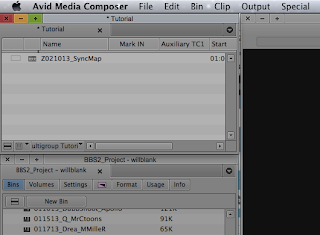
For your Bin Layout create these columns, in this exact order:
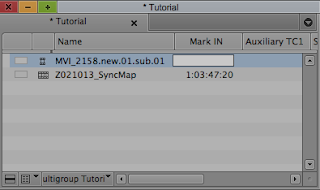
This is what your upper left hand corner should look like, with your sync map inside your bin:
Numbers 1-7 should be mapped to your keyboard in Avid as follows:
This is what your keyboard should look like:

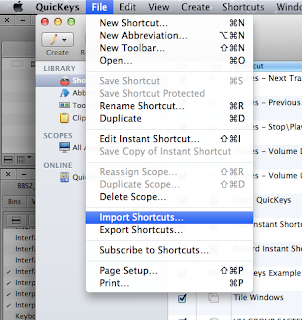
Once you have the keyboard set up, open QuicKeys and load the QuicKeys file downloadable here: https://dl.dropboxusercontent.com/u/46592759/qk_multigroup_setting.qkmx
Double click and open the "QK Multigroup" setting that should appear in your QuicKeys Editor window. Everything you need is laid out in this file. You can scroll through it and see the various steps of the multigrouping process that will be automated.
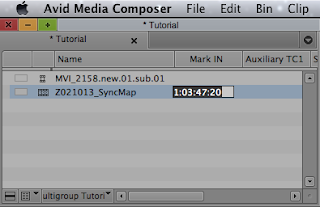
Now scroll down to Step 15:
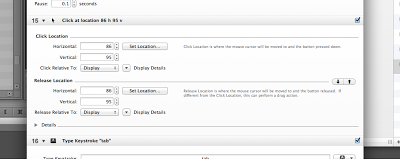
Click “Set Location” and the window below will pop up.

Press the Caps Lock Key with the mouse over the Name Column’s first entry field. Then click OK. Set the Release Location (Also Step 15 in the QuicKeys file) for the same spot.
It’s important that you keep your bin lined up properly in this corner otherwise you will have to redo this step.
Now, very important: run this macro one layer at a time, making sure to solo your video tracks. Each layer should look like this as you go, with the green solo button activated (On a Mac, hold down Command and click on the monitor icon):

If all of your settings are otherwise correct, you can skip towards the bottom and learn how to activate the macro. Otherwise, read on for a description of exactly what the macro will be doing, step by step:
First, the QuicKeys macro will create a subclip using the multigrouping keystrokes assigned to the numbers 1-6.
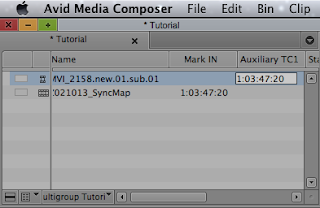
After the subclip has been created, Step 15 will click in the name column, then Step 18 (“TAB”) will shift you to the Mark In Column.
Step 20 (“Shift + Return”) will take you to the bottom of the bin, where your sequence is located.
QuicKeys will copy that Mark In value, which will be the basis of your Auxiliary Timecode entries. It will then hit tab again, which will bring you to the Auxiliary TC1 Column.
Then it will press enter, which brings you back up to your subclip, then it will hit paste, which pastes the Mark In value to the subclip’s Auxiliary TC1 Column.
Apple + 0 will bring you back to the timeline, “7” will skip you to the next Add Edit point.
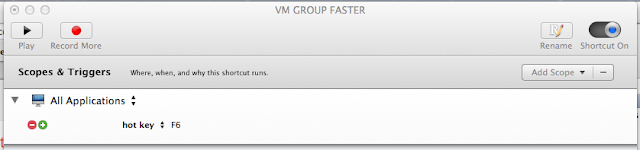
Now go ahead and designate a keystroke to activate the macro. In my case it is F6.
Finally, time to start the process.
NOTE: YOU MUST DEACTIVATE SEGMENT/OVERWRITE TOOLS FOR THE MACRO TO FUNCTION PROPERLY. Otherwise the timeline indicator will get "stuck" on individual clips.
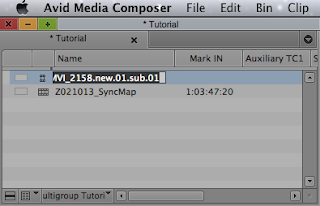
Press F6 (or whatever key you've set) in Avid with your timeline activated. A window will pop up asking you how many times you want it to run. You can count or estimate. Just make sure: if it repeats itself at the end of the sequence because you estimated incorrectly, delete the subclips with identical Aux Timecode.
You'll also end up with Sub-Sequences in your bin. That's what happens over filler with no clip. You can delete those as well. Just make sure, of course, not to delete your Sync Map on accident.
Then voilà, you have automated the process of adding Auxiliary Timecode in Avid!
NOTE: Don't do any audio layers with your video except for Aux TC. If they are polyphonic you just need to do one of those as it subs them all together.
NOTE: This tutorial is geared towards a Mac setup. I don't know whether or not the QuicKeys file I provide will work on a PC, but the process should be easily recreated in whatever software you are using.
Thanks to Vinnie Manierre for providing this information/collaborating with me and thanks to some other very talented post production gurus and AEs as well, including Rob Kraut and Vincent Rocca.
For a comprehensive multigrouping tutorial please check out this page by Tim Leavitt: http://viewfromthecuttingroomfloor.wordpress.com/2008/04/17/multigroups/
As well as this excellent multigrouping video tutorial by Vincent Rocca: http://www.youtube.com/watch?v=aDR8nRXSTyc
OK. Let's get started!
You Will Need:
- Avid (any version should work)
- QuicKeys (http://startly.com/products/quickeys/mac/4/) or Keyboard Maestro (http://www.keyboardmaestro.com/main/). Both offer free, fully-functional trial versions.
For your Bin Layout create these columns, in this exact order:
- Name
- Mark In
- Aux Timecode
This is what your upper left hand corner should look like, with your sync map inside your bin:

Numbers 1-7 should be mapped to your keyboard in Avid as follows:
- Mark Clip
- Go to In
- Match frame
- Go to Out
- Mark Out
- Make Subclip
- Fast Forward
This is what your keyboard should look like:
Once you have the keyboard set up, open QuicKeys and load the QuicKeys file downloadable here: https://dl.dropboxusercontent.com/u/46592759/qk_multigroup_setting.qkmx

Double click and open the "QK Multigroup" setting that should appear in your QuicKeys Editor window. Everything you need is laid out in this file. You can scroll through it and see the various steps of the multigrouping process that will be automated.
Now scroll down to Step 15:

Click “Set Location” and the window below will pop up.

Press the Caps Lock Key with the mouse over the Name Column’s first entry field. Then click OK. Set the Release Location (Also Step 15 in the QuicKeys file) for the same spot.
It’s important that you keep your bin lined up properly in this corner otherwise you will have to redo this step.
Now, very important: run this macro one layer at a time, making sure to solo your video tracks. Each layer should look like this as you go, with the green solo button activated (On a Mac, hold down Command and click on the monitor icon):

If all of your settings are otherwise correct, you can skip towards the bottom and learn how to activate the macro. Otherwise, read on for a description of exactly what the macro will be doing, step by step:
First, the QuicKeys macro will create a subclip using the multigrouping keystrokes assigned to the numbers 1-6.
After the subclip has been created, Step 15 will click in the name column, then Step 18 (“TAB”) will shift you to the Mark In Column.


Step 20 (“Shift + Return”) will take you to the bottom of the bin, where your sequence is located.

QuicKeys will copy that Mark In value, which will be the basis of your Auxiliary Timecode entries. It will then hit tab again, which will bring you to the Auxiliary TC1 Column.
Then it will press enter, which brings you back up to your subclip, then it will hit paste, which pastes the Mark In value to the subclip’s Auxiliary TC1 Column.

Apple + 0 will bring you back to the timeline, “7” will skip you to the next Add Edit point.
Now go ahead and designate a keystroke to activate the macro. In my case it is F6.

Finally, time to start the process.
NOTE: YOU MUST DEACTIVATE SEGMENT/OVERWRITE TOOLS FOR THE MACRO TO FUNCTION PROPERLY. Otherwise the timeline indicator will get "stuck" on individual clips.
Press F6 (or whatever key you've set) in Avid with your timeline activated. A window will pop up asking you how many times you want it to run. You can count or estimate. Just make sure: if it repeats itself at the end of the sequence because you estimated incorrectly, delete the subclips with identical Aux Timecode.
You'll also end up with Sub-Sequences in your bin. That's what happens over filler with no clip. You can delete those as well. Just make sure, of course, not to delete your Sync Map on accident.
Then voilà, you have automated the process of adding Auxiliary Timecode in Avid!
NOTE: Don't do any audio layers with your video except for Aux TC. If they are polyphonic you just need to do one of those as it subs them all together.
Subscribe to:
Posts (Atom)